Put yourself on internet with Jekyll, GitHub and Cloudflare

Photo by HalGatewood.com on Unsplash · 19/9/2016
Having a website on internet is a very powerful tool, you can create a tech blog, like mine, a site with your curriculum vitae, a portfolio, whatever you want. Being on internet increases your visibility and let other people know who you are, what do you do, or other information you consider important. But if you dedicate yourself to technology, computers, development and so on, you must have your space on internet. No excuses.
There are literally a lot of ways (platforms, CMS, etc.) to create your own site on internet: WordPress, Medium, Ghost… But today, I’m introducing you an static site generator named Jekyll.
Jekyll is a CMS that offers a different way to put your content on internet, with support for images, texts, comments, etc. What differences Jekyll from other CMS like WordPress or Ghost, is that Jekyll is just a tool to transform your plain text into a website or blog. No databases, no configurations, just your plain text, images, videos, etc.
You may prefer having a WordPress hosted in WordPress.com, but what if I told you Jekyll may be hosted for free using GitHub pages even with your own domain?. GitHub will provide a free hosting on its servers with high availability and Cloudflare will help configuring your domain. Sounds great, huh?
I’m sure you are prepared to give a try to Jekyll and that’s why I’m going to explain in this article how you can create your own website/blog using it.
Create a “host” for Jekyll in GitHub
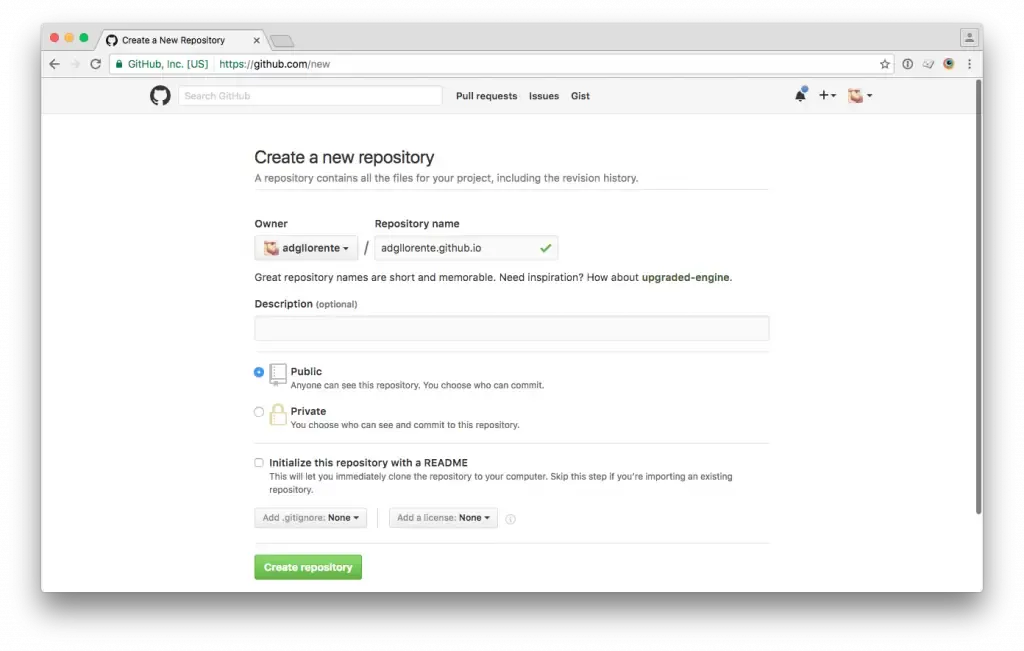
In GitHub you can create websites for yourself, your projects or your organization. Follow these steps to create a repository to host Jekyll:
- Go to GitHub and login with your username and password
- Clicks on New repository to create a new repository
- Name your repository <your-username>.github.io. Mine will be: adgllorente.github.io
Deploy Jekyll in your host at GitHub
In the previous step we have created a repository that will be the hosting for our Jekyll website, in this step we are going to deploy Jekyll into GitHub pages. Open a Terminal and type:
# IMPORTANT: Replace <username> with your GitHub username.

# Install Jekyll using gem
gem install jekyll bundler

# Create a new Jekyll website
jekyll new <username>.github.io
cd <username>.github.io
bundle install
Before uploading your website you must edit _config.yml to configure your domain name. Open _config.yml and edit this line with your GitHub domain https://<username>.github.io.
url: "https://<username>.github.io" # the base hostname & protocol for your siteFinally, go back to your terminal and push your website to GitHub.
# IMPORTANT: Use your username instead of <username>

# Push your fresh install to your repository
git init
git remote add origin git@github.com:<username>/<username>.github.io.git
git add .
git commit -m "Initial commit"
git push origin master
That’s all! Your website will be available at: https://<username>.github.io
Installing a theme for Jekyll
Jekyll is just static content but that doesn’t mean you can’t personalize it with a wonderful theme. In this step I’m going to show you static doesn’t mean ugly.
- Find a Jekyll theme, for example I’ve downloaded Airspace from Jekyllthemes.org
- Unzip, copy all files in the folder and paste them in your Jekyll root folder
- Attention: Check _config.yml to set url and baseurl values to your previous values.
url: "https://<username>.github.io" # the base hostname & protocol for your site
baseurl: ""- Build jekyll and push your changes. I’ve removed about.md because jekyll build was failing.
jekyll build
git add .
git commit -m "Install new theme"
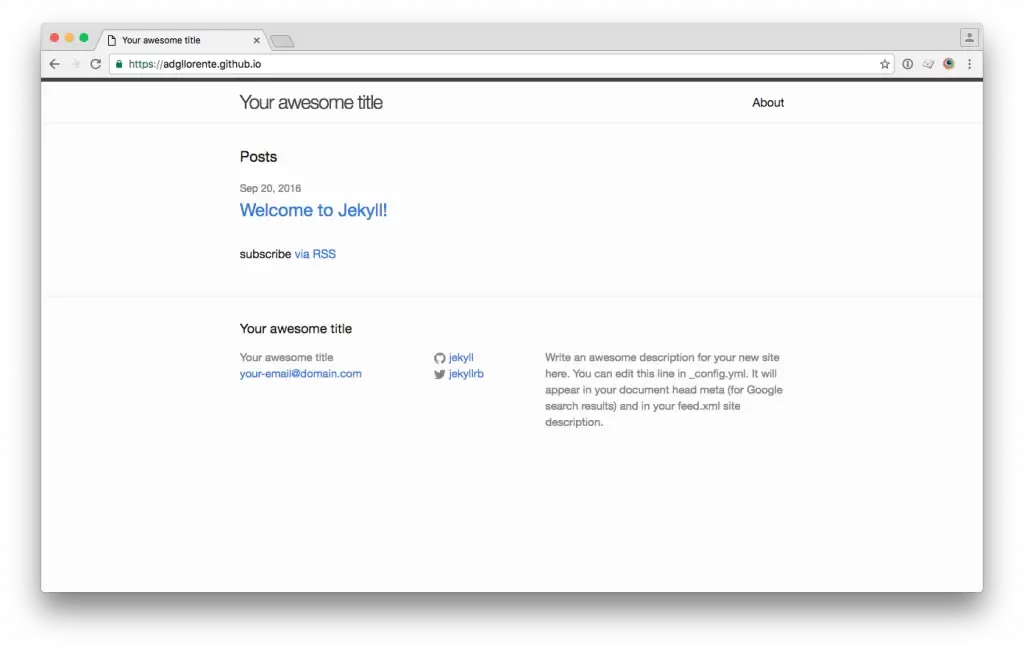
git push origin masterThat’s all, your website will have a fantastic appearance, actually it looks quite professional:

Creating your first post
As I’ve told you before, Jekyll is all about plain content, no databases, no dynamic things, just your text. Creating a new post is quite simple, let’s do it:
- Create a new file in _posts/ folder with this structure <year>-<month>-<day>-title.markdown (2016-09-20-welcome-to-my-website.markdown)
- Add your post content to this file, for example:
--
layout: post
title: "Welcome to my website!"
date: 2016-09-20 20:28:40 +0200
collection: offtopic

---

Hi, my name is Adrián Gómez and I'm pleased to welcome you to my new blog.

This blog is using Jekyll and this is just a post example.

{% highlight javascript %}
// Jekyll has syntax highlighter for Javascript too.
console.log('Hello World!');
{% endhighlight %}

And we also [have links!][link-example]

[link-example]: https://adgllorente.com
After writing your post you only have to build Jekyll and push this into GitHub like this:
# Build your site
jekyll build

# Push to github
git add .
git commit -m "Write new post"
git push origin master
In the image below you can see an example of your recently created post:

For more information about posting or configuring Jekyll:
- Jekyll documentation
- Markdown syntax examples
- Dillinger.io: A Markdown editor
- Jekyll documentation: “Writing posts”
Configuring your domain name with Cloudflare
I’m mostly a frontend developer and I’m not used to configure Apache, Bind, Ftp, Linux Users, etc. but I own a dedicated server, and that means I have to configure all of them, and so do I. But configuring domain names is my Achilles’ heel and that’s why I’m using Cloudflare.
Cloudflare is not only a DNS manager, it provides extra tools to boost your website speed. To start using it you need to create an account, add a domain name and change your domain DNS to point to Cloudflare’s DNS servers. In this step I’m supposing you already have a domain name configured in Cloudflare. You can follow this guide if you don’t have one.
In this example I’m using a subdomain testjekyll.adgllorente.com to point to my Jekyll page but if you want to configure a domain instead of a subdomain you only have to follow almost the same steps but filling information with your domain instead of your subdomain.
First of all we need to tell GitHub we are configuring our own domain name:
- Go to GitHub.com > <username>.github.io repository > Settings
- In the section GitHub pages you can add your own domain name, in my case testjekyll.adgllorente.com
- Click in Save

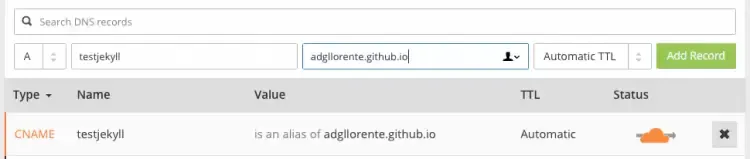
Now we need to configure our domain name in Cloudflare:
- Go to Cloudflare, select your domain name and click on DNS
- Add your domain information and click on Add Record
- Once created, click on the cloud on the right to set it with an orange colour
- Note: If you want to set your domain name, replace github with your domain name.
Your domain name is fully configured with just these steps, you can test it visiting your domain, in my case adgllorente.github.io.
Boosting load speed with Cloudflare
Cloudflare has a lot of tools but I’m going to review a few of them to boost your site performance:
- Select your domain name and click on Speed
- Mark everything on Auto Minify
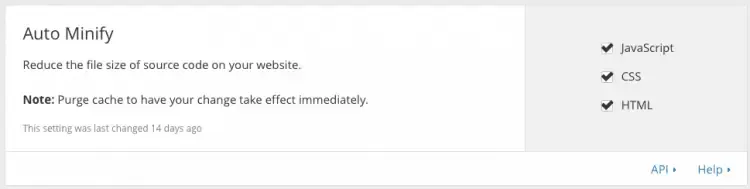
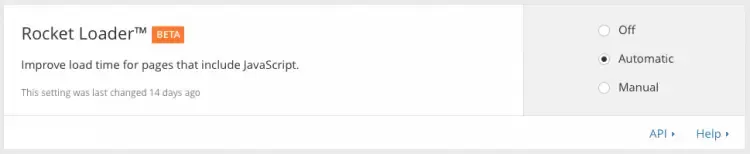
- Scroll down to Rocket Loader
- Mark Automatic
- Now go to Cache
- Scroll down to Caching Level
- Mark Standard
That’s all! Your website will loads in seconds with just a few changes.
Conclusion
Jekyll has a few pros:
- Static content usually means faster and more secure
- It has beautiful themes
- Its configuration is simple.
- You don’t need PHP, MySQL, or even a server because you can use Github instead.
But it also has a few cons:
- You don’t have a WYSIWYG editor so you have to use Markdown or similar languages to write your posts. If you use this for a client, you should make sure your client understands Markdown or he he is not going to update his website too much.
- You have to deal with a Terminal to push your changes using GIT
- Although you can configure some plugins or comments with Disquss, WordPress has many more plugins.
In my opinion, Jekyll is a good choice if you are a developer, you don’t mind using GIT to push updates and you love plain text to save information. Jekyll is also a good choice for small projects like an App Landing Page, a curriculum vitae, etc. but I won’t use it for a big project or for a very special project.
· Adrián Gómez
Powered by Astro + TailwindCSS + Markdown